Maple syrup production is a tradition that turns tree sap into gold. It starts with understanding the process perfected by generations. This guide will take you through each stage, from tree selection to bottling.
The process requires patience, skill, and a connection to nature. Producers see making maple syrup as both an art and science. They turn raw sap into a sweetener that captures the forest’s essence.
Your journey starts in winter when maple trees store sugars in their roots. As temperatures change, trees prepare to release their sap. Maple syrup making is a dance with nature, needing precise timing and technique.
Every step in maple syrup making is important. From picking the right trees to boiling the sap, you’ll learn old techniques. The reward is a natural sweetener that tells a story of tradition and craftsmanship.
Professional sugarmakers know it’s more than just sap collection. It’s about respecting trees, understanding seasons, and using proven methods. This guide will help you make your own maple syrup, connecting you to a rich tradition.
Get ready for a journey into maple syrup making. This guide will show you how to turn tree sap into a golden, sweet treat. It’s perfect for beginners or those wanting to learn more.
Introduction to Traditional Maple Syrup Production
Maple syrup production is a journey into North America’s food history. It connects people across generations, turning tree sap into golden syrup. This tradition mixes old ways with new methods, showing the blend of culture and farming.
The history of maple syrup goes back to North America’s past. Native tribes first found out how to turn maple sap into syrup. They did this long before European settlers came.
History of Maple Syrup Making
Indigenous groups in the northeast started making maple syrup. They used wooden tools and clay pots to boil sap. This made a valuable food and trade item.
- Native Americans first identified maple sap’s value
- Early methods used stone pots and wooden tools
- Maple syrup was a food and economic resource
Why Make Your Own Maple Syrup
Making your own maple syrup has many benefits. It lets you control the process and use only natural ingredients. This means no added stuff.
- Better taste and quality
- A connection to traditional food ways
- Learning about complex syrup making
- Potential savings for those who make it
Understanding the Maple Syrup Season
The maple syrup season is a short but critical time. It happens from late winter to early spring. This period needs the right weather and timing.
To make syrup, you must know the natural cycles. Daytime warmth and nighttime coolness are key for sap flow. This special weather turns sap into the syrup loved by many.
Essential Equipment and Tools for Maple Syrup Making
Maple syrup production needs specific tools to turn tree sap into tasty syrup. Sugarmakers use both old and new methods. Choosing the right tools can make a big difference in syrup quality.
For great maple syrup, you need top-notch tools for sap gathering and processing. The key equipment includes:
- Tapping Tools
- Hand drill or power drill
- Spiles (taps)
- Hammer for installation
- Collection Equipment
- Food-grade collection buckets
- Plastic tubing systems
- Storage containers
- Boiling and Processing Tools
- Large evaporation pan
- Thermometer
- Hydrometer for sugar content measurement
- Filtering equipment
Starters can begin with basic tools and add more as they grow. Producers might use advanced systems like reverse osmosis machines for better efficiency.
When choosing tools, think about your budget. Hobbyists might start with simple methods. But, commercial producers need more complex systems.
Investing in quality tools is key to creating a pure maple syrup recipe that stands out in flavor and consistency.
The right tools make maple syrup making fun and rewarding for everyone, no matter their skill level.
Identifying the Right Maple Trees for Tapping
Maple tree tapping starts with picking the right trees for syrup. Not all maple trees are good for making syrup. It’s important to know which trees are best for syrup making.
Good maple syrup makers focus on tree selection. Different maple trees have different amounts of sugar and sap.
Different Types of Maple Trees
Some maple trees are better for syrup than others. Here are the top ones:
- Sugar Maple: The best for syrup
- Black Maple: Similar to sugar maple
- Red Maple: A good choice with less sugar
Tree Size and Health Requirements
Tree selection is more than just the type. The best maple trees for tapping have certain qualities:
| Tree Characteristic | Minimum Requirements |
|---|---|
| Minimum Diameter | 10 inches at chest height |
| Tree Age | 40+ years old |
| Health Indicators | Strong bark, no visible disease or damage |
Best Location for Tapping
Where you tap a maple tree matters a lot. Look for spots with:
- South-facing sides with good sun exposure
- Smooth bark without significant wounds
- Areas between major branches
Experts say to move tap locations each year. This keeps the tree healthy and the sap flowing. Choosing the right tree and tapping it correctly is key to making great maple syrup.
When to Start Your Maple Syrup Making Process Step by Step
The maple syrup making process starts with knowing when to collect sap. It’s all about the weather. The sap flows best when the day is warm and the night is cold.
Maple trees sap up when it’s just right outside. The best time is when it’s above 40°F during the day and below freezing at night. This usually happens from late February to early April.
- Late Winter Preparation: Check trees and equipment
- Early Spring Monitoring: Watch temperature fluctuations
- Peak Sap Season: Typically 4-6 weeks long
Where you are affects how maple syrup is made. Places like Vermont and New Hampshire have longer sap seasons. This is different from southern areas.
| Region | Typical Sap Season | Average Collection Period |
|---|---|---|
| Northeast United States | Late February – Mid April | 4-6 weeks |
| Midwest United States | March – Early April | 3-5 weeks |
Weather is key for making maple syrup. Sugarmakers need to watch the weather closely. This helps get the most sap and syrup.
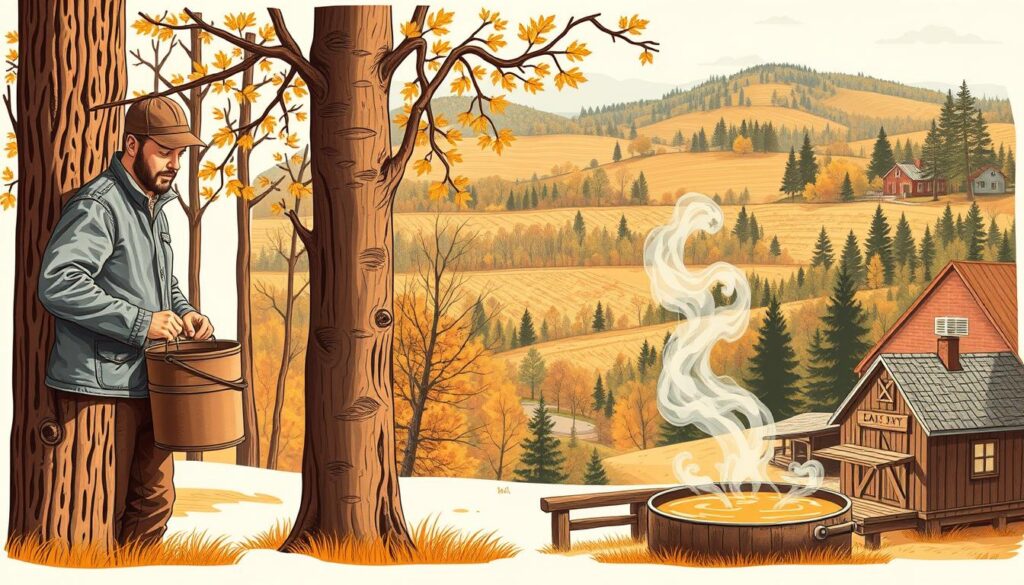
Proper Tree Tapping Techniques
Maple tree tapping is an art that needs precision and care. To get maple sap, you must know how to tap trees right. This guide will show you how to prepare and tap maple trees for syrup.
First, pick the right tree and get your tools ready. Not all maple trees make good sap. Look for mature trees with a diameter of at least 10 inches for sap collection.
Drilling the Tap Hole
Drilling tap holes is key. Here’s what to do:
- Choose a sunny side of the tree with good exposure
- Drill at a slightly upward angle to help sap flow
- Use a clean, sharp drill bit between 7/16 and 5/16 inches in diameter
- Drill 1.5 to 2 inches deep into the tree
Installing Spiles Correctly
Spile installation is vital for tapping trees well. Clean and sanitize your spiles before use to avoid contamination. Gently tap the spile into the hole, making sure it fits well without harming the tree.
Attaching Collection Systems
There are many ways to collect maple sap:
- Traditional bucket systems
- Plastic tubing networks
- Vacuum-assisted collection systems
Each method has its benefits. Tubing and vacuum systems usually collect sap more efficiently than buckets.
Pro tip: Limit tapping to 2-3 taps per tree to maintain the tree’s health and ensure long-term sap production.
Maple Sap Collection Methods and Storage
Maple syrup starts with collecting sap from maple trees. Sugarmakers use different ways to get sap, each good for different sizes of production.

- Bucket Collection System
- Good for small syrup making
- Let’s you watch sap flow
- Needs sap to be emptied often
- Tubing Network Collection
- Works well for big syrup making
- Less work needed
- Uses gravity or vacuum to move sap
New ways to collect sap have changed syrup making. Vacuum tubing can get up to 3-4 times more sap than old methods.
| Collection Method | Sap Yield | Labor Intensity | Cost |
|---|---|---|---|
| Bucket System | Low | High | Low |
| Tubing Network | High | Low | High |
| Vacuum-Assisted Tubing | Very High | Low | High |
Storing sap right is key to keeping syrup quality. Sugarmakers must keep sap cold, below 38°F, to stop bacteria and keep sugar.
“The key to exceptional maple syrup is not just in the collection, but in the careful handling of sap before boiling.” – Maple Syrup Experts
Choosing how to collect sap depends on your size, budget, and what you have. Each method has its own benefits for making syrup from sap.
Understanding Sap to Syrup Ratios
Learning to make maple syrup means knowing how sap turns into syrup. This process is very detailed and needs careful measurement. It’s all about turning raw sap into pure maple syrup.
Maple sap has different sugar levels, which affect how much syrup you get. Sugarmakers use special tools to measure these levels:
- Hydrometers for measuring sugar density
- Refractometers to determine sugar content
- Digital sugar testing equipment
Sugar Content Measurements
Maple sap usually has about 2-3% sugar. To make pure maple syrup, a lot of sap is needed. On average, 40 gallons of sap make just one gallon of maple syrup.
Expected Yields
How much syrup you get depends on a few things:
- Tree health and age
- Seasonal temperature changes
- Sugar level in the sap
Good sugarmakers know they’ll get 10-20% syrup from their sap. They understand that making great syrup takes patience and precision.
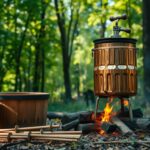
Setting Up Your Evaporation Station
Setting up an efficient evaporation station is key for making homemade maple syrup. The process of boiling maple syrup needs careful planning and the right tools. This turns raw sap into tasty syrup.
When setting up your evaporation space, you have several options. Important things to consider include:
- Heat source selection
- Ventilation requirements
- Space optimization
- Safety precautions
Choosing the right evaporator is very important for your maple syrup making experience. Small producers might use stovetop setups. But serious enthusiasts often choose larger arch evaporators.
“The heart of maple syrup production is the evaporation station – where sap transforms into liquid gold.” – Traditional Sugarmaker’s Wisdom
When designing your evaporation space, remember these key points:
- Make sure there’s good ventilation to handle steam
- Choose a heat-resistant work surface
- Install enough lighting
- Organize storage for tools
Safety is a must in making homemade maple syrup. Use fire extinguishers, wear heat-resistant gloves, and keep your workspace clean. This helps avoid accidents during the boiling process.
The Boiling Process: From Sap to Syrup
The maple syrup boiling process turns raw sap into golden syrup. It’s done with careful temperature control and precise techniques. Sugarmakers see this as the most important part of making maple syrup, where sap magically changes.
To master the maple syrup making process, you need to understand the boiling dynamics. Professional syrup producers watch many factors closely during this key stage.
Temperature Control Techniques
Keeping the right temperature is key to syrup quality. Sugarmakers follow these important steps:
- Keep the heat steady between 219-221 degrees Fahrenheit
- Use special evaporation tools
- Look for color and consistency changes
Monitoring Syrup Density
Tracking syrup density is done with special tools. These help producers find the perfect syrup consistency:
- Use a hydrometer to check sugar levels
- Check how thick the syrup is while boiling
- Do temperature checks often
Avoiding Common Boiling Mistakes
Experienced maple syrup makers avoid mistakes by watching closely and using the right techniques:
- Never leave the sap boiling alone
- Remove foam often
- Stop heating before syrup gets too thick
Knowing these steps helps make high-quality maple syrup. It turns simple tree sap into a tasty treat.
Filtering Your Maple Syrup
To make pure maple syrup, you need to filter it carefully. This step is key to getting a clear, top-notch syrup. Filtering removes unwanted bits and makes the syrup smooth and refined.
There are several steps and methods in maple syrup filtering. Sugarmakers use different ways to clean the syrup:
- Cloth filters for traditional approaches
- Paper filters for precision cleaning
- Pressure filtration systems for commercial production
The best filtering method depends on how you plan to use the syrup. Hot filtration is usually best for homemade syrup. It filters the syrup while it’s hot, around 185-200°F. This helps remove particles more effectively.
Important things to keep in mind for good syrup filtering are:
- Use clean, food-grade filtering materials
- Keep the temperature steady during filtering
- Work fast to keep the syrup quality high
- Avoid adding any extra contaminants
Sugarmakers often suggest filtering the syrup multiple times. Each time, they remove smaller particles. This makes the syrup clearer and meets high standards.
Remember: Proper filtration is the difference between good and exceptional homemade maple syrup.
Proper Bottling and Storage Techniques
Finishing your maple syrup making journey needs careful attention to bottling and storage. The final steps of maple syrup bottling are key to keeping the rich flavor and quality you’ve worked hard for.
When getting ready for maple syrup bottling, temperature is very important. You should bottle your syrup while it’s hot, around 180-190 degrees Fahrenheit. This helps seal the bottle well and keeps it from getting contaminated.
Sterilization Methods
Proper sterilization is essential for successful maple syrup bottling. Follow these important steps:
- Wash bottles thoroughly with hot, soapy water
- Rinse bottles completely with clean water
- Sanitize bottles using a commercial food-grade sanitizer
- Allow bottles to air dry completely before filling
Storage Conditions
Storage techniques greatly affect your maple syrup’s quality. Here are some professional tips for keeping maple syrup fresh:
- Store in a cool, dark place
- Keep containers tightly sealed
- Refrigerate after opening
- Use glass containers for best preservation
Pro tip: Unopened maple syrup can last up to one year when stored properly. Once opened, consume within six months for the best flavor.
By following these maple syrup bottling techniques, you’ll make sure your syrup stays delicious and fresh for months.
Grading and Quality Assessment

Knowing the grading system is key in maple syrup making. Sugarmakers use many ways to check their syrup’s quality. This helps both buyers and makers understand the syrup’s unique traits and worth.
Maple syrup grades are based on color and taste. The USDA has four main grades:
- Golden Color, Delicate Taste: Lightest grade with a soft maple flavor
- Amber Color, Rich Taste: Medium color with a strong maple taste
- Dark Color, Robust Taste: Deeper color with a bold maple flavor
- Very Dark Color, Strong Taste: Darkest grade with a very intense maple taste
Checking syrup quality involves several steps. Sugarmakers use special tools to measure:
- Density with a refractometer
- Color with grading charts
- Flavor through taste tests
- Clarity and consistency
Many things affect syrup quality. These include the health of the trees, when to tap them, how to collect sap, and how to boil it. Skilled sugarmakers carefully manage these factors to make top-notch maple syrup.
Troubleshooting Common Problems
Every homemade maple syrup journey has its challenges. Knowing common issues helps sugarmakers deal with problems in their process.
Maple syrup production needs careful attention. Some common problems can mess up the process of turning sap into syrup.
- Low Sap Flow: This problem often comes from weather or tree health. Warm days and cold nights are best for sap flow.
- Off-Flavors in Syrup: Bad tastes can come from bacteria or sap from budding trees.
- Equipment Malfunction: Leaks, damaged parts, or wrong temperature settings can ruin syrup quality.
Preventing problems is key to making good homemade maple syrup. Keeping equipment in good shape and watching closely can help avoid issues.
Experienced sugarmakers suggest:
- Clean equipment well between uses
- Check tap holes for tight seals
- Watch sap storage temperatures
- Use clean containers for sap
If problems keep happening, talking to local experts or seasoned maple syrup makers can help a lot.
Conclusion
Starting to make maple syrup is a journey that connects you to a long-standing American tradition. It’s a process that requires patience, skill, and a love for nature’s sweetness. From picking the right maple trees to mastering boiling techniques, it’s a mix of science and art.
Success in maple syrup making is more than just following steps. It’s about knowing how to tap trees, collect sap, and understand tree health. It teaches you to respect nature and traditional skills.
Whether you’re new or experienced, making maple syrup is a chance to improve your craft. New tools can help old ways, but the heart of maple syrup making stays true to tradition. Your journey will give you a tasty sweetener and a deep connection to farming and the forest.
Begin your maple syrup adventure with passion, care, and a curious mind. The benefits are more than just the syrup. You’ll learn, appreciate sustainable food, and connect with a beloved American tradition.